Please click on the image to see it in full size.
Model and photos by Artur Golebiewski.
A short review of the kit.
Years ago I came across the old Gloster Gladiator kit from Lindbergh still with the Mk.I style propeller. Originally I purchased it with the thought of creating a kit of "Pat" Pattle's machine, which he used in the Western Desert before being posted to Greece and flying the Mk.II version.
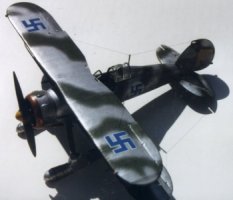
Then I came across an excellent resource book about the Gladiator from AJ Press. The book is in Polish but offers such wealth of information about the various colour schemes and interesting histories of the Gladiator that I just could not resist picking out a project based on the F19 unit of Swedish fighting on the side of Finland in the Winter War of 1939/1940.
The kit is typical of old sixties productions, thick plastic parts and the bare minimum of interior. It measures out decently against the original and does not have any obvious disproportion in its shape. The effect of fabric-covered fuselage and wings is nicely achieved by gentle ribbing and a textured surface. The engine cowling is a bit thick and needs to be sanded down for better fit. The canopy is rather thick, but as no alternatives were available the original was used. It can either be mounted in the open or closed positions.
The general fit of the parts is decent with the exception of the lower wing to the fuselage. Large seams need to be filled and sanded. I used Miliput for mine.
The kit was assembled with the lower wing attached to the fuselage and the top wing loose, at which point it was painted. The spars were attached to the top wing and small holes drilled in them. In the previous Gladiator project I installed the wiring by drilling holes through the wings themselves and running the wires (thin string) and then filling in the holes with putty and sanding them down. That effect was not satisfactory since on the ribbed surface of the wings it was impossible to achieve the same texture as the simulated fabric and it was extremely hard to match the concave contour of the ribbing. This time around I predrilled the struts at a point just barely above where they touch the wings and run the string through that. Much better this time!
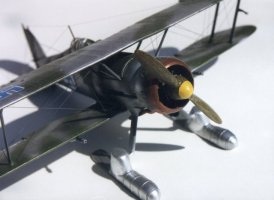
The paints I use were "vintage" Humbrol authentic Swedish colour range, which seems to match the recommended FS codes. They were grey under and olive green upper surfaces with a dividing line running right down mid-fuselage. Over that, standard Swedish camouflage, I oversprayed aluminium. There was quite a bit of overspray evident on the photographs so I did not mask it before painting. Next came the challenge of the ski undercarriage. After looking for months for some sort of a conversion kit I gave up and sculpted them out of miliput based on the documentation in the above mentioned book. This took a while but finally I got something resembling the original skis. They were also painted aluminium. The struts for the skis were the same ones as used for the wheels. Radio antennas were added and decals from an excellent Aeromaster kit added.
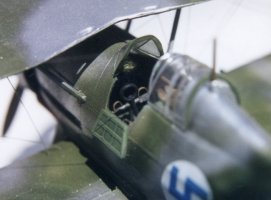
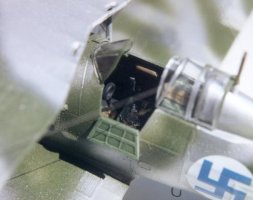
A little detail was added to the cockpit in the shape of rudder pedals, several levers and straps on the seat. A pair of skis was affixed behind the pilot. I assumed the Swedes used them in case of emergency landings just like the Finns.
/Artur Golebiewski